
Red Hat Identity Management Installation Automation - Course Monster Blog
All system administrators should be slackers. Not in the sense of not performing their work, but in the sense of doing it as effectively as possible. Why bother doing things by hand when you can automate them? The more difficult work is, the more motivation there is for it to be automated.
When it comes to Identity Management, it makes sense to automate the process. Red Hat Identity Management (IDM) is simple to set up, but you’ll need more workstations as your environment grows. You’d definitely have an intranet and a DMZ in a conventional data center, and your servers would be divided into development and production. The person who should have access to your servers will most likely be organized into groups as well, with database, web, and application administrators being among them. Not to mention your system administrators, who require complete access.
Why should you go with automation instead of a manual installation?
Trying to maintain administrative files like sudo and access.conf, depending on the size of your environment, might take a long time. You must make adjustments to all of the relevant servers when adding or removing a user. This might take time and lead to a decrease in production. If a person’s access is valid after they leave, it might also create a security hole. IdM can take care of this for you, and automating the installation and setup saves you time when it comes to getting your environments up and running.
Setting up Automation
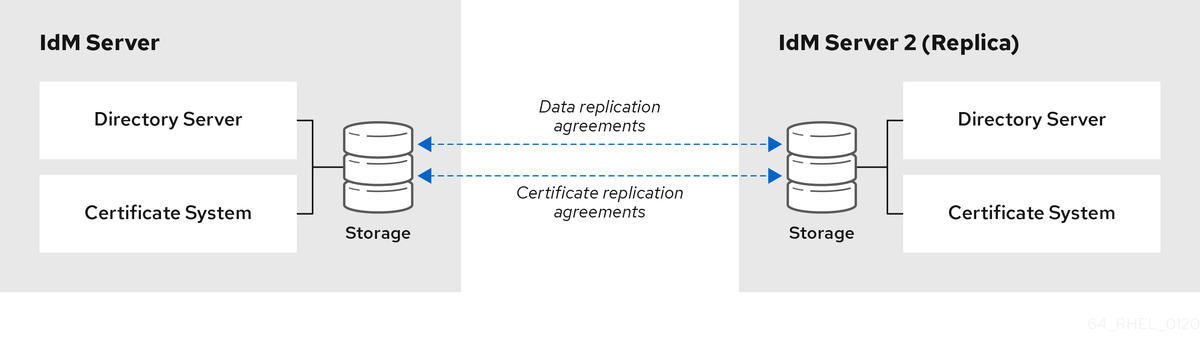
I’ll use a basic IDM environment in this example. It comprises a single IdM domain with two RHEL 8.5 IdM servers. The first is the main, which contains the certificate authority (CA), and the second is the replica, which also serves as a backup CA.
The developers established an upstream project called ansible-freeipa to make IdM management easier, and this has been incorporated into the sources. “But Ansible is a subscription,” you might be thinking, but Red Hat Enterprise Linux (RHEL) includes the core Ansible components, allowing you to use it to run playbooks created or generated by Red Hat products like RHEL System Roles, OpenSCAP, or Insights remediation playbooks, and ansible-freeipa playbooks.
The environment
We’ll need three virtual machines because this is a basic setup. The primary IdM server will be one, the replica will be another, and the third will be used for Ansible and will also be a client. All three servers have the identical setup of two vCPUS, 4GB of RAM, and 30GB of storage.
We’ll install Ansible on the IdM client because it only has to be installed on one system. We’ll need to add the ansible-2.9-for-rhel-8-x86 64-rpms repository to RHEL versions 8.5 and earlier. This repo comes with the RHEL subscription and is used to automate RHEL applications. Ansible Engine has been replaced by Ansible Core in RHEL 8.6 and later. You won’t need to enable a separate source to obtain this because it’s included in the App Stream source.
Your repository list should look like this:

Ansible, ansible-freeipa, and the RHEL system roles must all be installed. The ansible-freeipa package can be found in the rhel-8-for-x86 64-app stream-rpms repository and contains the modules required to automate IdM installation and configuration. The nameserver entries will be updated to point to the IdM server using the RHEL system roles.
We may begin working on the inventory and playbook files when the packages have been installed.
Inventory file
The inventory file in Ansible’s default installation is named hosts, and it’s located in /etc/ansible. This file will include all of our host information and variables. If you are used to the INI format, you will see that I will be utilizing the YAML format.
You’ll need to change the host’s file and add three specific groups: ipaserver, ipareplicas, and ipaclients to establish our IdM main server.
Your principal IdM server is the ipaserver group. The CA revocation service is located here. All of the IdM replicas you’ll be installing will be in the ipareplicas group. Last but not least, there’s the ipaclients group. This group is only for customers who will be using the ipaclient package.
Base, Server, Client, DNS, and Special are several types of variables.
The base variables are those that are necessary for a basic IdM installation. Passwords, as well as the realm, domain, and hostnames, are included.
Server variables include parameters to set up, such as KRA and DNS, as well as those required to set up the IdM environment, such as the initial user and group id numbers, and do not redirect the Web UI.
Client variables are oriented for clients and can include things like whether or not to configure ssh, sudo, or NTP on the client.
DNS variables, as the name implies, are DNS options. Allowing zone overlap, creating a reverse DNS, or configuring forwarders.
Finally, there are the special variables. These variables include settings for the firewall zone to employ, as well as a few more that don’t fit anyplace else.
There are also Certificate System, AD Trust, and SSL variables, but we won’t be utilizing any of them because we’re performing a simple setup.
We’ll also add a few new variables, such as IdM short, root domain, and nameserver, to make any future additions or modifications to the playbook easier. Our FQDN will be created by joining IDM short and root domain, and the nameserver variable will be used to update our DNS and point to the IP of our principal IdM server.
Each host will have its own set of variables, but we’ll build global variables out of those that will be used several times and add them to the additional variables.
The ipaadmin password and the ipadm password must be added. We’ll be able to log in to both the Web UI (IPA admin password) and the LDAP (ipadm password) using this. For further protection, these passwords should be distinct from one another.
As a result, the global variable section should seem as follows:
We’ll move on to the ipaserver variables now that we have our global variables. We’ll put them in the host category. We’ll need to remove the “null” item at the end of the host entry because we’re adding variables to it. There are no host variables if this item is present.
We’ll utilize the idm short and root domain variables we created before to build the ipaserver domain variable, which will then be used for the ipaserver realm variable.
Next, we will set up the DNS by adding ipaserver_setup_dns, ipaserver_reverse_zones, ipaserver_allow_zone_overlap, and ipaserver_no_forwarders to our variable list. These will instruct Ansible to install DNS, establish a reverse zone, skip checking to see whether there is already a DNS record for our name and skip configuring forwarders.
Finally, we’ll inform the IdM server to which firewall zone the firewalls should be attached. You don’t need this if you just have public, but we’ve had customers who didn’t utilize public and couldn’t deploy replicas or clients as a result.
As a result, our server variable list should look like this:
We utilize a number of variables for replicas that are similar to the ones we use for the server. We don’t need to generate a new admin password, and we don’t need the domain or realm variables because they’re only configured on the server.
We’ll need to rebuild the DNS and firewall variables, as well as the backup CA variable since we’ll have one.
Instead of using ipaserver as our prefix, we’ll use ipareplica and include ipareplica setup ca create a backup CA.
We need to update the nameservers to point to the primary DNS so that the replicas may resolve the DNS entries of the new IdM environment. We’ll utilize the network system role to do this. For that, we already defined a global variable.
We’ll need to configure dhcp4, dns, address, and gateway4 because we’re utilizing a static IP. We’ll utilize the information gathered by Ansible for both the address and the gateway4, and we’ll reuse both the IP and the gateway. We’ll set the dhcp4 variable to no, and we’ll use the nameserver variable we defined previously with the ipaserver IP for the dns variable.
As a result, the following should be added to the vars section of our inventory file:
Finally, we get to what our customers require. We simply need to add the ability to establish a home directory when a user comes in for the first time and alter the nameserver as we did with the ipareplicas group, so it’s really straightforward.
This is a rather modest inventory file, with only 29 lines for our setup. You can add as many replicas and clients as you like, however with the CA option, I wouldn’t add too many replicas because it might cause network congestion. We advocate having no more than three or four CAs, including the central server.
The inventory file should look something like this once it’s finished:
Playbook
The game plan is straightforward. Apart from the playbook, I’ll create one role that will allow PTR sync for both forward and reverse domains, which is disabled by default, whether the install is done manually or through automation. PTR records will be produced if PTR sync is enabled, so you won’t have to do it manually afterward.
To establish the directory structure I require for this job, I first use the mkdir command.
Then I create the main.yml file and use ipadnszone to ensure both allow_sync_ptr and dynamic_update are enabled on both the forward and reverse zones.
All that’s left is to write the actual playbook we’ll be utilizing. Three ansible-freeipa playbooks (install-server.yml, install-replica.yml, and install-client.yml) and one RHEL system role will be used for this role (network). The DNS servers on both the ipareplicas and ipaclients will be updated first. They need to be able to resolve the ipaserver and its SRV records, thus this is done.
The idm-dnsconfig role will then be installed between the server and replica installs, allowing us to construct PTR records for the replica(s) and client(s) when they are added.
We still have a few things to finish before we can execute this playbook. We must guarantee that the Ansible host, rh8.blog.example.com, is capable of resolving the IP addresses of the IdM servers and clients. We’ll achieve this by adding them to the Ansible host’s /etc/hosts file.
If you’re running this as root, make sure to specifically ask pass = True in the ansible.cfg files. If you are using a different account, you will also need to set become=True, become_method=sudo, become_user=root, and become_ask_pass=True that are further down the file.
After you’ve completed all of this, you’re ready to run the playbook.
Because we’re executing this as root, I’m not using the “privilege escalation” part of the ansible.cfg file. If your security policy prohibits root login through SSH, you’ll need to activate these and use a user with sudo capabilities. Because it requires root capabilities, you’ll also need to add “become: true” to the network task.
Here at CourseMonster, we know how hard it may be to find the right time and funds for training. We provide effective training programs that enable you to select the training option that best meets the demands of your company.
For more information, please get in touch with one of our course advisers today or contact us at training@coursemonster.com


Comments ()